
If you want to learn how to use WordPress to create website, the best idea is to use WAMP to install WordPress locally on your computer.
It is always the best strategy used by even WordPress experts to test run new scripts like plugin, edit codes, try new UI design structures before it goes live.
Setting up WordPress on your computer is like installing a game app like ‘Chess board’. You’ll want to play around with it all alone to learn new tactics, great movements and then try out numerous strategies on how to capture the King and the Queen.
WordPress is such an amazing CMS (content management software) that can be used to bring about endless possibilities in web development. It is a platform that can bring the depth of your creative imagination to the physical.
The only barrier I see now is how to use WordPress to create what you want. The starting point is learning it. The good part again is that you don’t necessarily have to start learning the theoretical aspect of WordPress.
You can go straight to the practical part just like an apprentice because really, WordPress is a craft.
“WordPress is a craft you can learn like an apprentice”
You can learn WordPress online and of course, do great developmental processes. But, the down side is that apart from the fact that it will cost you money (the internet connection, domain name, hosting server), the entire process will be slow, tedious and can be time consuming.
What if you can get a system that would provide all the above needed requirements for WordPress to function at no cost? Apart from that, you can access it right on your computer without internet connection.
If that look like what you’d prefer, then stick on while I walk you through how you can make your computer a server that WordPress can reside to build your next website.
How to turn your windows computer into a web host server
Before you can create a site on WordPress, you’ll need:
– Domain name
– Host server
The hosting server will provide;
Database (MySQL) upon which WordPress scripts (PHP) will operate from.
There are a handful of applications that can provide all these amenities on your computer- WAMP, XAMPP, MAMP, LAMP, etc.
The principal ones that I have used and know very well are WAMP and XAMPP. Both are good and free (Open source software), but I’ll be using WAMP for this tutorial. All you need do is to install WAMP server on your system.
What is WAMP? You might want to ask.
WAMP is just an acronym for Windows (the operating system); Apache (the server); MySQL (the database); and PHP (the script language). I wouldn’t want to bug you with all that details.
How to install WAMP server on your computer
I’ll be using windows 7 as the bases for my explanation on this tutorial. Don’t worry, wamp can run on any version of windows if you download the appropriate version for your system.
Okay, let’s start with the installation.
Go to WAMP website here and either scroll down to download section or click the download link on the header menu.
Download the exact version of your system. For me, my computer system is 64bits.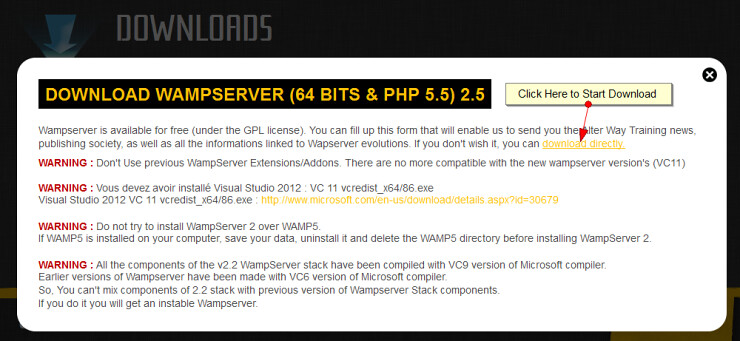 If you don’t know the system version of your computer; go to the ‘Start Menu‘ on the task bar and click on ‘Control panel’.
Click ‘System and Security‘ among the listed options on the page.
Click on ‘System‘ and you’ll see the basic information about your system including the bits.
Alternatively, you may go to the ‘Start menu‘ and click on ‘My Computer‘.
Left click an open space and then click on ‘Property‘ among the option menu that popup.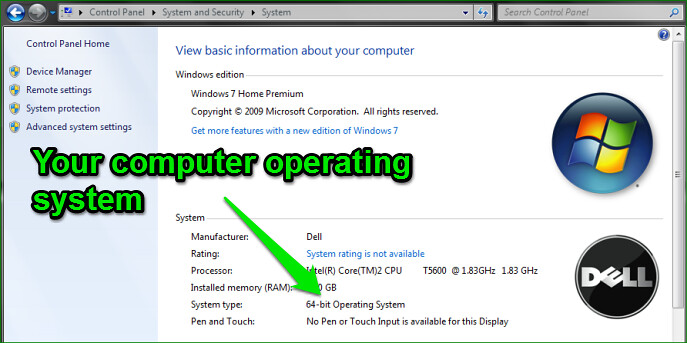
Now, I want to assume you’ve downloaded the exact version of WAMP for your system, if not just download the 32 bits version. It will also work on 64 bits.
Locate the download file on your computer and run the installation process. Just follow the prompt. It is self explanatory. But ensure you all access when you’re prompted if Windows firewall is blocking installations.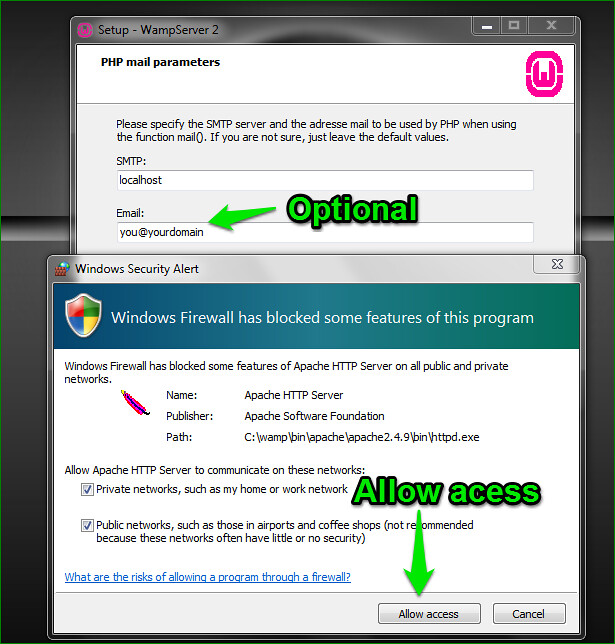
However, you’ll get to a point during the cause of installation where you would be prompted to specify your default browser.
You have to locate your default browser by going to your program files (C:programs) and select the actual default browser.
Use the popup menu to select the browser. You’ll have to click on ‘Local file’ and then click on ‘Program files’.
Locate your default browser from the list and select the file.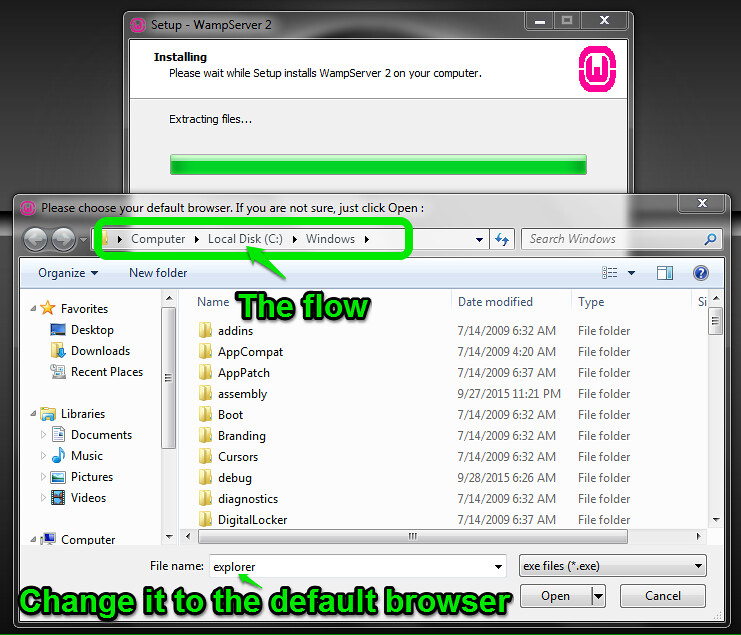
NOTE: Though the selected default browser during installation is explorer. You still have to choose your default browser manually otherwise there will be an error and WAMP may not run on your system. It could be showing messages of ‘important file missing’ each time you want to start it.
After selecting your default browser, click ‘Open‘ to continue with the installation and WAMP would be installed properly on your system.
Ensure you create shortcuts by checking the boxes for this purpose during installation process.
The next stage is to install WordPress, but before then, you’ll have to create a database for it.
How to create database for WordPress on WAMP server
Go to the ‘Start menu‘ on your computer and mouse-over ‘All Programs‘ and then find and click on ‘Wampserver‘ to get it started.
You’ll see WAMP icon on your task bar. Allow it to turn from red color to green and then click on it. Click on ‘phpMyAdmin‘ on the menu that fly out.
This will open phpMyAdmin on the default browser you set during installation.
Alternatively, you may simply go to the link below on your browser;
http://localhost/phpmyadmin
Click on ‘Database‘ and enter a name for it in the appropriate box and then, click the ‘Create‘ button.
You’ll see the database you created among the list of menu on the left. Write down this name somewhere because you’ll need it as the installation progresses.
All roads are now clear for you to install WordPress on your computer.
How to install WordPress on wamp localhost
You know you’ve created a localhost environment (web host) on your computer using wamp server. So now, I’ll be taking you through the process of installing WordPress on wamp server in windows 7 (that’s the version of my computer). The process is the same for all versions of windows that can run WAMP server.
Let’s start now.
Go to WordPress here and download the latest version.
You’ll need internet connection to do this. Once you’ve downloaded it, you don’t need internet connection again throughout the installation.
Locate the WordPress file you’ve just downloaded on your computer. It comes in zip file. So, you’ll have to unzip it (that’s extract it).
To extract it, just left click on it and click on ‘extract all‘ among the menu option that popup.
Copy the extracted folder and paste it on the ‘www‘ folder in wamp server- (C:wampwww).
To locate this ‘www’ folder;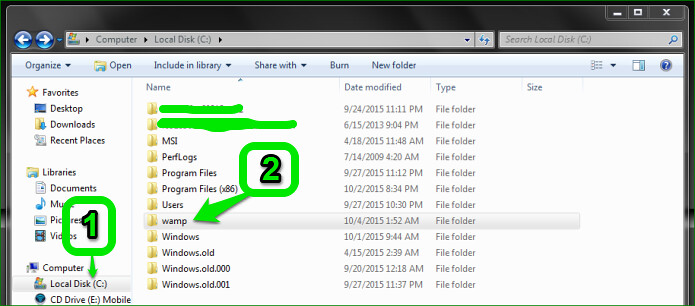
Go to the program files on your computer system. Click on ‘wamp‘ and locate ‘www‘ folder.
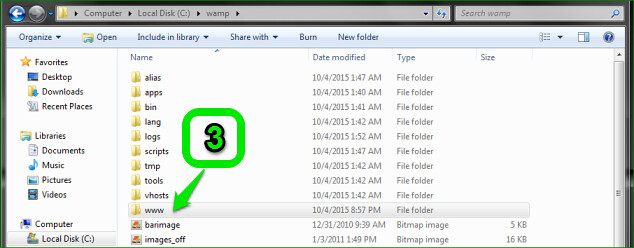
You may rename WordPress folder before copying and pasting on ‘www’ folder, but it’s really optional. The only thing is that what you name the folder would eventually become the suffix that would be appended to your local site URL.
For the example on this tutorial, I did not rename the WordPress folder. So, the folder name remains wordpress.
The URL of my local site therefore would be;
http://localhost/wordpress/
From this stage, you’re set to run WordPress installation. If you get the whole process till this stage, then you’re really done because the remaining half is self installation. Just follow the prompts and fill the forms appropriately.
Run WordPress installation on your local server
Copy the above URL [(http://localhost/wordpress/) I’m assuming you did not rename the extracted WordPress folder before pasting into ‘www’ folder on wamp server]. Paste it on your browser and click enter.
This will prompt pre-installation script informing you of the needed information to connect with your database on phpMyAdmin. This is necessary for wp-config.php file that structures WordPress configuration.
Click the ‘Let’s go‘ button.
The next page will show where to input the information needed to connect with the database.
This is how you’ll fill the data;
– Database Name: Type the name of the database you created initially. For this tutorial, it was ‘frandi_db‘
– User Name: Type in ‘root’
– Password: Leave box empty
– Database Host: Leave it as localhost
– Table Prefix: Also leave as wp_
Click the ‘Submit‘ button at the bottom of the page. You should see a screen that confirmed ‘WordPress can now communicate with your database’.
 Click the ‘Run the Install‘ button to proceed.
The welcome page will unveil the popular ‘five-minute’ WordPress installation form. You should be familiar with the form if you have installed WordPress before.
Fill the form appropriately. The username and password you set at this stage will become your wp-admin log in credentials.
If the password you choose is not strong enough, you will be prompted to confirm a weak password by checking a box provided just below the password box.
Enter your email and uncheck the ‘Allow search engine to index the site’ box under ‘Privacy’. This is necessary since you’ll be working offline anyway.

Click ‘Install WordPress‘ button when you’re done.
You should see a success page with your username and hidden password box.
Click the ‘Log in‘ link to proceed to WP log in page.
Enter the username you created and password and then hit the log in button.
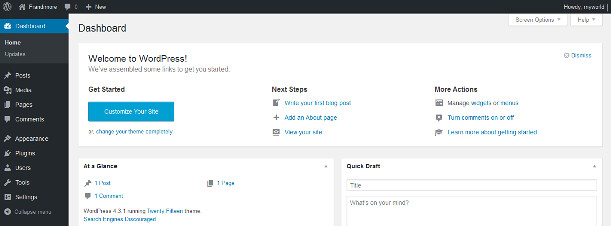
You’ll be greeted by your WP dashboard where you can start learning WordPress or testing creative developmental ideas as if you’re online.
You can access your WP admin log in page above anytime by simply opening your browser (you must have ‘start WAMP’ on your system and allow it to turn to either orange or green color) and the go to;
http://localhost/wordpress/wp-login.php
OR
http://localhost/wordpress/wp-admin
You may bookmark it so that you don’t have to type the log in URL each time you want to access it.
NOTE: You have to download new themes and plugins each time you want to install them locally just the same way you did before installing WordPress locally on WAMP server.
Yeah! Everything is now set for you to test, learn, develop and create with WordPress except one thing. WAMP server does not activate pretty permalinks by default. And this will make your URL look like the one below;
http://localhost/wordpress/?=21
Custom permalink you can set on ‘Setting’ >> ‘Permalink‘ will not work either. They would be returning ‘Page not found’ for valid links. You need to correct this especially when testing new content strategies.
How to activate custom permalink on your wamp server
To correct this error, simply go to your task bar on your desktop and click on wamp icon.
Mouse-over ‘Apache‘ and then ‘Apache modules‘ and scroll down to locate ‘rewrite_module‘.
Click on it and make sure it is checked. This will get it activated and it will correct the abnormal URL structures.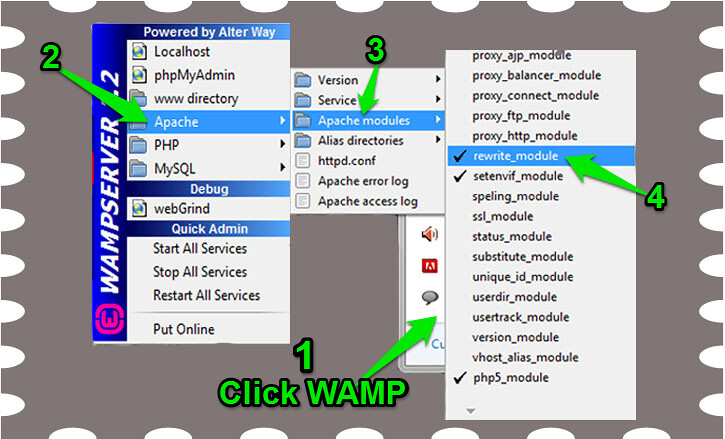 Alternatively, you may go to wamp on your task bar.
Mouse-over ‘Apache‘ and click on ‘http.conf‘ to open the file. The file will open on notepad.
Find the line of code below;
#LoadModule rewrite_module modules/mod_rewrite.so
Replace it with this one below;
LoadModule rewrite_module modules/mod_rewrite.so
Save the file and you’re done.
Conclusion: Whether you’re an expert web developer or WordPress beginner or BlogSpot user that wants to migrate to WordPress, getting a local server will help you actualize your aim in no small measure.
Apart from the fact that you’ll have WordPress seated right on your computer with all the paraphernalia of web hosting environment at no cost, you also do not need an internet connection.
Your server is not vulnerable to things like slow loading associated with poor internet connection, server breakdown, downtime, etc. No fear of visitors seeing a distorted page while testing is ongoing. This makes your developmental process with WordPress smooth, easier and faster.
This is a guaranteed peace of mind while working on web related environment. What do you think?
WordPress on localhost provides guaranteed peace of mind while working on web related processes.
- How to Add Post Thumbnail Image to RSS Feed on WordPress - February 16, 2016
- 10 Tips for Getting the Most out of Google Image Search - January 19, 2016
- How to Add Next and Previous Post Links with Thumbnail - January 11, 2016


Hello Francis ‘Toke,
Its very important for every blogger to know how to install WP Locally on Computer. It helps us lot. We can examine a website before publishing to net. You discussed it in details. I hope every blogger must read it once to know ins & outs of WAMP software.
Happy Blogging 🙂
Hi Ashan,
That’s true. It has the capacity to speed up developmental process without incurring cost on internet connection and then you’re save to test and explore new things.
Thanks for visiting our blog.