One of the tricks for implementing the best user experience on website is ensuring audience are presented with the information they sort for as fast as possible. Just as it would be a great service if you walk into a restaurant and you’re served fresh and hot menu as soon as you nearly complete placing your order.
Won’t you want to have a second look at the place with a sign of relief even though you were famished when you came in.
People don’t like to wait to get what they want when they know they have more than a million alternative. W3 total cache plugin has been designed for WordPress to help make this trick of fast page load possible.
This plugin transforms virtually all your web pages to static HTML the first time visitor access them and store them on your behave representing them almost as mirror image on request so that your server resource infrastructure is not over labored for the same request over and over again.
For website with low traffic, this may not be a problem, but sudden hike in traffic from search engine for instance can make your site breakdown. What a loss in great opportunity to showcase your brand!
It is now a known fact that search engine algorithm has been configured to reward sites that have faster page load with higher rank on search table.
You know why? Because they want to create magic experience that will satisfy their customer and they rely on your website to achieve this fit. And you have to depend on them to reach your target audience. So, it’s a win-win thing with you and search engine.
If you desire faster page load, enhanced page rank and audience satisfaction, your best bet is W3 total cache.
Why W3 total cache is the best WordPress caching plugin
– It is more elaborate and extensive
– The possibility of integrating numerous caching platforms both free and premium
– Enhance in-depth page caching capabilities
– It has the ability to cache any page file format
– More sensitive and receptive to balance page cache mechanism.
How to configure W3 total cache
One of the reasons bloggers or web designers especially beginners don’t like to use W3 total cache is because of the long list of modules needed to be set properly for it function at it’s optimum.
If this is your fear, never mind. I’m going to walk you through both the installation and configuration process step by step.
 Installation process: Log in to your WordPress admin and scroll down to Plugin on the Dashboard. Mouse over it and click on Add New.
On the search box, type in W3 total cache and click search plugin. Look for W3 total cache from the list of plugin displayed and click on Install Now.
Click Ok on the popup box that emerge suddenly. Allow the plugin to install automatically and then click Activate Plugin.
Configuration process: You have to set all the most important modules on w3 total cache for it to perform optimally. It is really easy and simple to set. Just follow the step by step process below.
However, it is expedient to give kudos to the developers of this plugin because they have set to default virtually all the most crucial caching elements only giving options for extraordinary performance especially on the recent version.
Step 1: General Setting Page
Go to admin dashboard, scroll down and mouse-over on Performance. Click on General setting on the list of menu that emerge. Scroll down to Page cache.
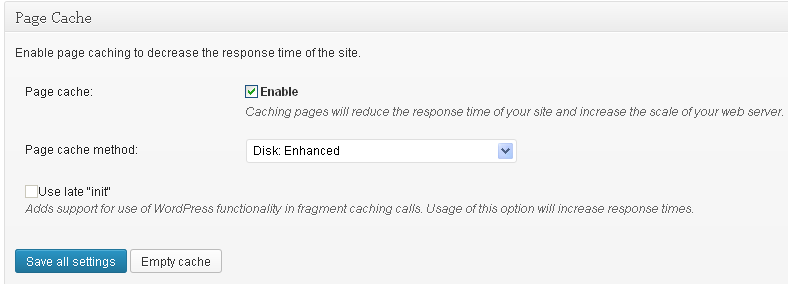
Page Cache: Check the Enable box and select Disk Enhanced on Page Cache Method.
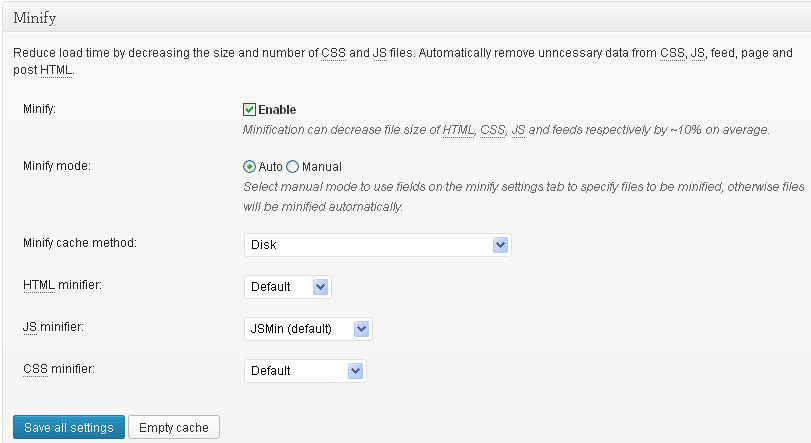
Minify: Check Enable box, set Minify Mode to Auto, Minify Cache Method to Disk, HTML Minifier to Default, JS Minifier to JSMin (default) and CSS Minifier to Default.
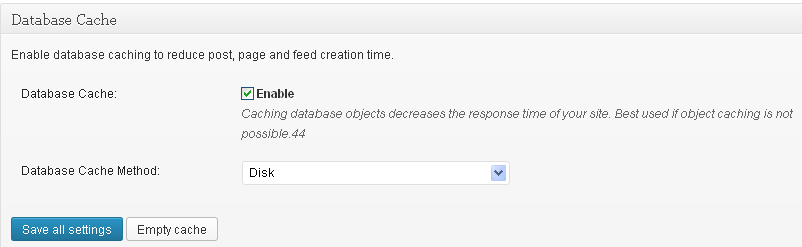
Database Cache: Check Enable box and set the Database Cache Method to Disk

Object Cache: Also check the Enable box and select Disk on Object Cache Method.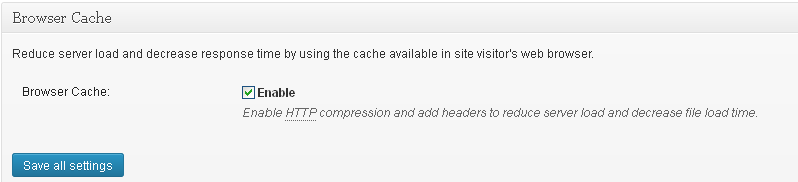 .
.
Browser Cache: Check The box against Enable. After this click ‘Save all settings’
All other settings are optional, though they greatly super cache your web pages if you can go the extra mile. Most of them are not free, but there are free versions like Cloudflare. All you need to do is sign up on their website, follow the simple setup setting and you are done.
You might want to setup CDN ( Content Delivery Network) if you have heavy site structure and large content with high traffic base.
It would greatly enhance page load. Please, only enable this feature if you have setup a third party client for this purpose like Amzon Cloudfront, AT&T, Generic Mirror or MaxCDN.
 Step 2: The next thing to do is go to the admin dashboard, scroll down to performance and click on Page Cache. Check the box against the following functions:
Cache posts page
Cache feeds: site, categories, tags, comments
Cache 404 (not found) pages
Cache requests only for www.yoursite.com site address
Don’t cache pages for logged in users
Don’t cache pages for following user roles (optional)
Click on Save all setting
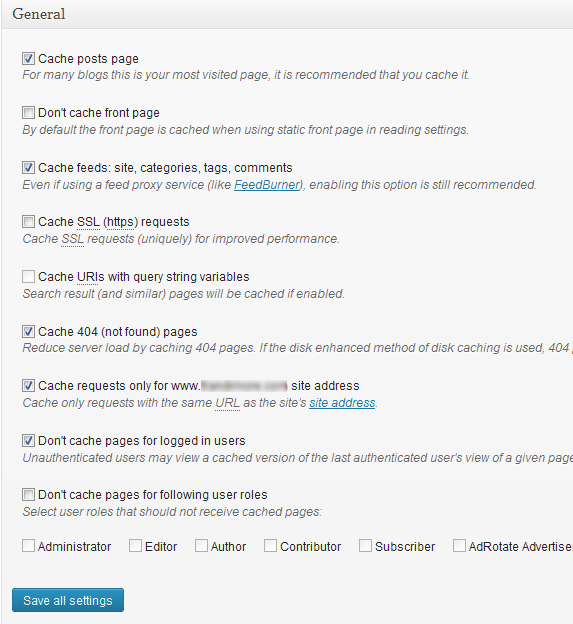
Do not set any other parameters. Leave them at their pre-set values.
How to test w3 total cache
If you want to know if really w3 total cache is now caching your web pages, go to any page on your website and click CTRL + U on the keyboard on your system.
Scroll down to the bottom of the Page source that emerge. You’ll see w3 total cache snippet showing that it has begin to cache your website.
![]()
In the alternative, you can right click an open page on your website, look for View Page source on the menu option. It would open the page source. Scroll down to the bottom to view w3 total cache snippet.
That is all about installing and configuring w3 total cache plugin to function properly. Do you know how else this plugin can be set for more effective result?
- How to Add Post Thumbnail Image to RSS Feed on WordPress - February 16, 2016
- 10 Tips for Getting the Most out of Google Image Search - January 19, 2016
- How to Add Next and Previous Post Links with Thumbnail - January 11, 2016