To post an article on WordPress blog is a necessity soon after the setup of website because, that is one sure way to showcase knowledge to gain audience.
You surely want your customer to know you’re an expert in your chosen niche and this is a formidable medium to help them through the information and tips you dish out from your blog while serving them with your products and services.
This would not have been possible if WordPress have not provided the platform that enables a well organized article posting in a reverse chronological order. Also, it has so many tools and features that made it super easy to use.
Procedure for posting on WordPress blog
There are steps to take to post on WordPress blogging platform. Below are the steps needed to post an article on WordPress blog.
Log in to your Admin panel: The first thing to do is to log in to your admin panel to be able to access the tools for creating a post.
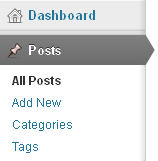 Go to Add New post: On the left side menu, scroll down to Post and let your cursor stay on it. A sub drop down menu will appear. Click on Add New and it would take you to the page where you can create your post.
The starting point
There are basic but fundamental things you must put into consideration when writing a post which would invariably determine the reach of the post.
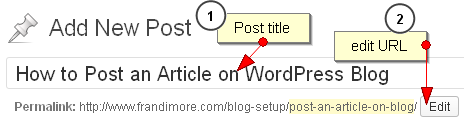 1. Title: The first thing is to slot in the title of your post in the long rectangular box. Please, your title must be concise and direct as possible.
Not more than 70 characters. Also, ensure your target keywords are included either as the starting words or somewhere within the middle. You may install Yoast SEO plugin to guide you on title length and target keyword inclusion from SEO perspective.
2. Edit URL: One of the significant reasons why I fell in love with WordPress is the opportunity to edit long URL, make it compact with my target keyword in focus and also, the ability to generate the shortlink for social media posts (most time this tool comes up beside view post when you want to edit a published post). All you need to do is to click on ‘Edit‘ to restructure your title URL.
Note, what you can edit is just the title URL that was automatically generated when you type in post title into the box provided. Click on the Get Shortlink to generate a short link url for the post. Ensure you’ve categorized the post before getting the shortlink.
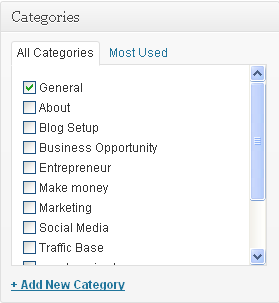 3. Archive post in the appropriate category: Category is a way to organize and group numerous posts in similar folder thereby making it easier to access during navigation.
For instance, all the posts on blog setup should be archived to blog setup category and the ones on marketing should also fall under marketing category. This post you are reading is archived under website design category because it is an extension of blog setup.
You can find this menu by the right just below the publish menu. The categories you’ve created will appear there and you can just check the appropriate box against the category you want to use for the post you’re creating.
Should you want to create a new category quickly then, click on Add New Category button below the category menu. Type the name of your category and click add new category. It would automatically be used for the current post and it would add up to the existing ones.
 Create your tags: Tags are similar to category, but they are not entirely the same. While category is putting similar post in the same folder, tags are the measure of keywords used within the post that target audience might likely use to search for the post.
Tags could be a word or phrase and it can be more than one. Just ensure they’re accurately targeted to the main theme of post. You can access this tool just below the feature image menu.
Type in the tags you want to use in the box provided using comma to separate multiple tags. You also have the option to choose from existing tags if you feel they fall within the keyword focus.
Click the link at the base of the tag and it would reveal your old tags. Click on the ones you want to add and it would be added automatically. Desist from using too many tags; it has a way of diluting keyword strength.
The main post body
WordPress has provided a post editor that look much like Microsoft Word. It has a feature called WYSIWYG editor (What You See Is What You Get). Also, it has two principal post editor interfaces- the plain and the HTML editors.
You need to be familiar with html codes to work or edit post in this environment. You may learn how to use, edit and manipulate this code at W3 schools should you want to do more than mere posting like embedding video, adding rel “nofollow” to links, manually adding codes like Google Adsense, plugins, etc.

Click Image to Enlarge
Nevertheless, the plain editor has all the tools and commands needed to create a great blog post.
However, the default WordPress editor is somewhat deficient if you intend to do more on your post like creating bold sub header, tables, horizontal rule, change font and style, etc. I advice you install tinyMCE Advance plugin and choose all the features you need on the setting page.
Other things to add before hitting the publish button
Add image: A picture they say worth a thousand words. It is imperative to add at least one image that has the capacity to covey your inner thought line on a post to your audience.
Apart from making the post and the entire blog beautiful, it would drive more traffic if the post is shared across social networks and if well optimized for SEO through alternate keyword, it can attract traffic from image search engine.
Remember, content marketing is gradually going visual with the advent of mobile content optimization drive.
There are two ways to add image to post on WordPress blog.
Click Image to Enlarge
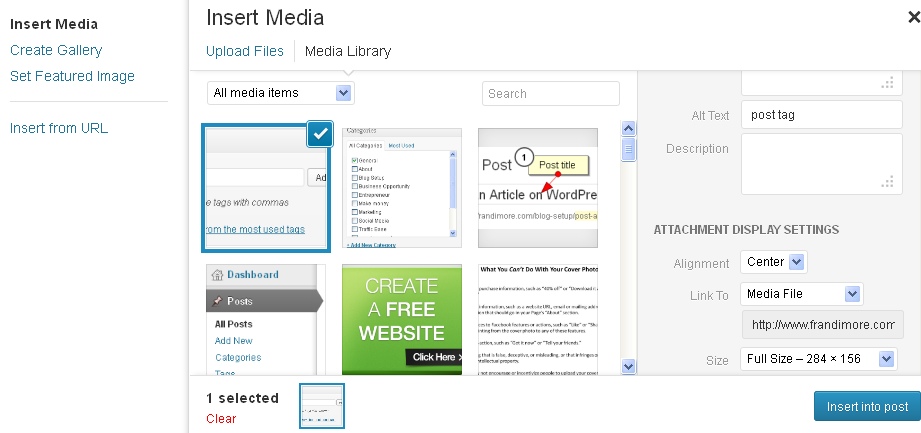
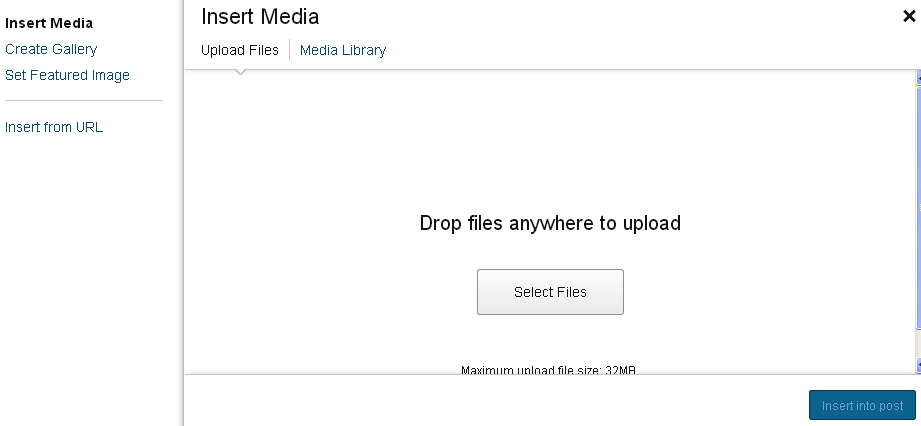
1. Add Media: Click on add media just above the top menu on post editor box. You must have clicked on the place where you want the image to appear. A page will pop up where you can upload image or choose from the existing ones on your template.
- To upload an image from your computer: Click on Upload Files on the top menu. Click on Select File. On the pop up page, you’ll see files on your computer. Locate the image you want to use and click on it. You cannot upload more than 32MB file at one time. You can save your image for web on your computer before uploading. Click on Open and allow some time for the image to upload into your image gallery. There is option for multiple image upload. Just switch to multiple uploader if you intend to upload more than one image at a time. After upload, you can edit the image; optimize it for SEO by filling in appropriately the boxes for title and alt text. You can also set the placement for the image whether centre, left or right. Then edit the image link and size. When you’re through with editing, click Insert into post and you’ll see the image render where you’d positioned your cursor.
- Upload image from URL; If you know the URL path to an image, just copy it and paste on the Insert From URL box and give it title. The image will appear below the link box. Click the Insert to Post button.
- Use image from gallery; Click on any image you want to use within the media gallery and click on Insert to Post after editing.

Click Image to Enlarge
2. Feature image: On the right side menu, just above the tags menu, you’ll see the set featured image link. Click on it and follow the above procedure for uploading image. Click on Set feature image when you’re done. You’ll see the image appear not within the post box but under the feature image menu. Feature images appear at the top of post.
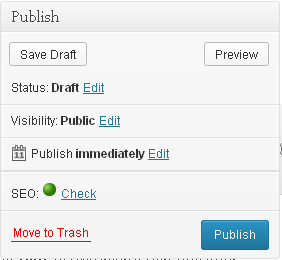 Preview post: This tool helps you see the post you created just as it would appear when published. The tool is located above the publish button by the right.
Save draft: Should you decide to postpone publish post time on the ground of adding useful information later or probably due to time constraint, etc. You can use this tool to save your post to draft. Click on it and your post will automatically save to draft. You can locate the file under All posts menu.
However, WordPress has build-in save to draft mechanism on post editor. So, as you type your post in the box, it saves them at periodic intervals.
Schedule post: You can use this tool to schedule post delivery at a pre-determined time by setting the date and time you want it publish and WordPress will help you handle the rest.
To do this, click on Edit in front of publish immediately and set the time and date you want it published.
Set visibility: You can also determine the type of audience that can have access to your post. All you need to do is Edit the visibility and set post visibility whether public, password protected or private.
Publish button: This is the last tool any blogger always use when updating or creating a fresh post. It’s like send button on compose email page. It turns to Update when a published post is edited. It is located within the box menu that contain save to draft and preview post buttons.
Click on it when you know you’re set to publish. (Always proof read your post before hitting the publish button). The new page confirms your post has been published with a link to view it.
Watch a video tutorial on posting an article on WordPress blog
How else do you create a post on your WordPress powered website or do you have challenges posting articles on your blog?
- How to Add Post Thumbnail Image to RSS Feed on WordPress - February 16, 2016
- 10 Tips for Getting the Most out of Google Image Search - January 19, 2016
- How to Add Next and Previous Post Links with Thumbnail - January 11, 2016


Very effectively written information. It is going to be worthwhile to anyone who usess it, including myself. Sustain the nice work – for certain i’ll take a look at extra posts. hd wallpapers for windows 7
@Sabbir Hossain Happy you found it useful. Thanks for those kind words.