From my research and experience on WordPress, Amazon SES (Simple Email Services) is the most effective and low cost email delivery system you’ll ever find around.
Why do I say this?
WordPress for instance, uses PHP mail() functions that solely depend on the server your site is hosted on to send your email messages.
So, technically speaking, the delivery will depend largely on the type of hosting package you got for your site and the allowed email quota set for your account.
In this era where most websites are on shared hosting, needless to say the email quota will be small (e.g. 60 mails per hour) and unreliable especially if the hosting server has been blacklisted.
This will hamper message delivery. These are some of the reasons your messages don’t make it to your recipient inbox.
DOWNLOAD THE EBOOK VERSION HERE
Just imagine what would happen to your transactional emails if you run an eCommerce site or your newsletter campaign if your list is bigger than what your quota can accommodate.
Your guess is as good as mine.
Again, it’s possible to setup Gmail SMTP to handle your message delivery. The downside is that though it’s free, but grossly limited in terms of the number of recipients you can send to at a given time.
It also has numerous attendant problems according to the blog post excerpt below by Ryan Suillivan:
It turns out that in order for Google to authorize a third party server to access your account via SMTP now, you have to enable “Less Secure Apps” on your Gmail account.
You can read a full explanation of what risks that subjects you to, and get a full explanation here, but essentially, any apps that aren’t using security protocols that Google deems mandatory, will be blocked unless you enable the ability for less secure apps to access your Gmail account.
Now while I won’t recommend you allow less secure apps to access your Gmail account, it’s currently the only way I know of to allow WordPress to use your Gmail account to send outgoing mail. – Ryan Suillivan
And the comment below by Korey Kashmer:
Over the last month (April / May of 2016) I’ve been working on updating a few applications that run local on one of my internal network computers.
I’ve used Google’s SMTP off a basic Gmail account for years with this application. When I made the changes all the sudden Google’s SMTP wouldn’t work.
I spent a few hours messing with it and ended up setting up a new user with HostGator just for sending. I kept researching and started to uncover recent changes that Google made to exactly what you’re mentioning here, Less Secure settings.
I just went today and reverted everything back to Google’s SMTP servers and updated all settings per your changes.
Worked like a charm! Google never tells anyone when a change is made. I couldn’t find any updated articles on this a month ago when they probably made this change. – Korey Kashmer.
Why Amazon SES is preferred to other email delivery services
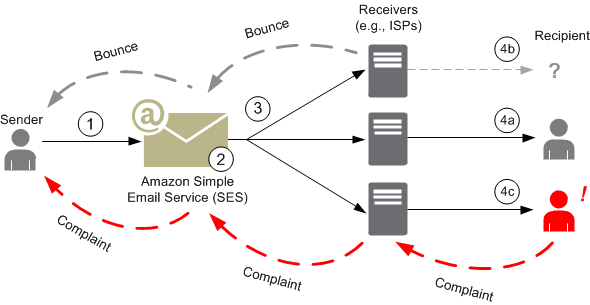 Amazon Simple Email Services will ensure your messages are delivered to your recipients’ inboxes and not spam folder. The delivery speed is also good and consistent.
Just ensure the email addresses are genuine and the targeted audience expects message from you. If not, this can spark-off complaints that may not be good for your brand reputation and could land you in probation or suspension if not quickly checked.
You can do yourself a great favour by setting up a dedicated email address to handle bounce mails.
Now, you may be wondering, why can’t I just get any other reliable SMTP services like Email Elastic, SendGrip, Mandrill and so on. Why Amazon SES?
Good question!
As much as these other email delivery services are good and reliable in terms of deliverability, they are much costlier than what I humbly feel startups’ on low budget can maintain.
Amazon SES prices beat others blue black on cost.
For example; to send a message to 10,000 recipients cost approximately 10 dollars on Email Elastic and SendGrip where as on Amazon SES it cost just a dollar (One dollar). Can you imagine that?

I challenge you to do your research and prove me wrong on this. This is not marketing gimmicks, it’s simply the truth.
Yes! I know that price is never the best negotiation tool in marketing. However, haven’t considered every other factors, I have come to realise that Amazon SES should be a go-to destination for email delivery if you are a blogger or infopreneur on low budget.
Okay! If you’re convinced of the need to use Amazon SES on your WordPress powered website, then let’s go over to set it up.
Steps to setup Amazon Simple Email Services on WordPress site
1. The first thing you need to do is to open an AWS account. This account qualifies you to access all AWS products among which are SES services.
Please note that apart from the long signup process, you’ll be required to verify a pin number through voice call (automated answering machine) to the number you supply and then input the credit card information that would be associated with your account for billing purposes.
2. Go to Services on your account dashboard and click on SES under the list of available services.
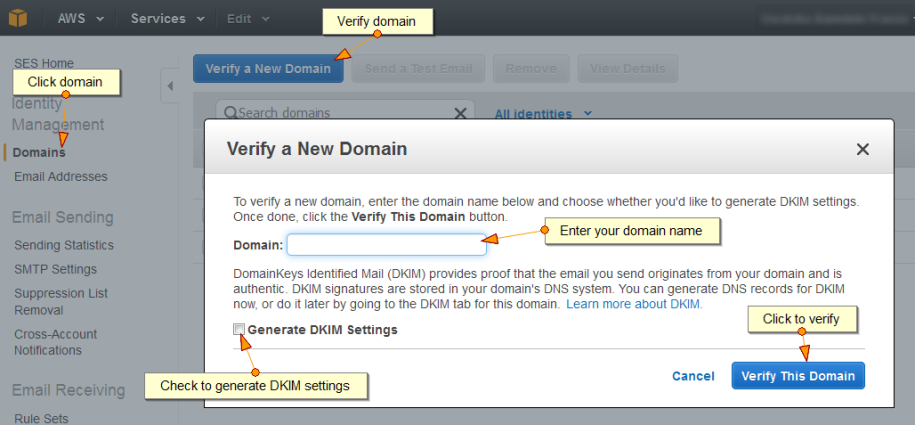
3. Click on Domain on the left menu pan so as to verify your domain name.
4. Now, click on “Verify a Domain“. Type your domain URL into the box provided on the popup window.
5. Check the DKIM setting to also generate CNAME data. You’ll have to input these data appropriately in your server DNS within your cpanel.
6. Click on “Verify Now”. You may choose to download the data.
Note: Make sure you have access to your web host server. Go and update your DNS with these data appropriately.
Go back to your AWS account.
Refresh the page and you’ll see the domain has been verified if you input the information into your DNS correctly.
4. Now, click on “Email Address“, still on the left pan menu. Click on “Verify Your Email Address“. Type the email address you intend to use for sending messages into the box on the popup window. Click on “Verify now“.
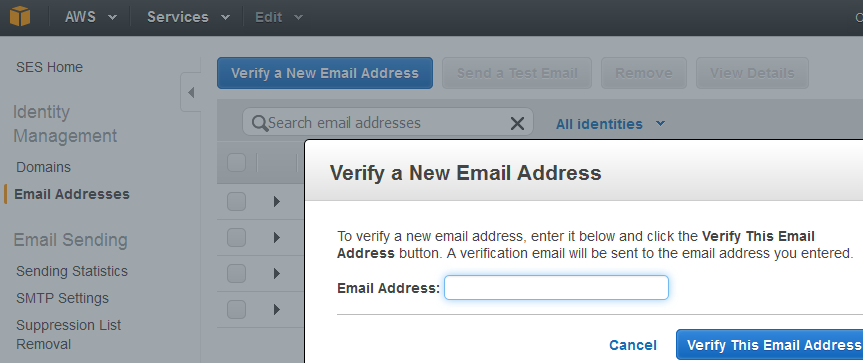
5. Go to the inbox of that email address and click on the confirmation link sent. You’ll see that the email address has been verified on the landing page on your AWS dashboard.
At this stage, you have successfully verified both your domain name and the email address you want to use for sending mails via Amazon SES.
Note that you will not be able to send messages until your domain and email are verified. You also have the privilege to verify multiple email addresses and domain names.
Okay! Let’s now move over to your WordPress back-end and synchronize it with Amazon SES settings.
Configure Amazon SES on your WordPress blog
There are basically two ways to go about this depending on what you want to achieve.
If you want to use it simply for sending transactional messages, then you may install WP SES plugin.
However, if you intend to do more and also want to incorporate newsletter management, then I advise you install a premium plugin like MyMail, MailPoet, etc and configure it to use Amazon SES as the default sending SMTP path.
How to setup WP SES for transactional email delivery
This plugin shall help you by-pass the default WordPress PHP mail sending pattern and route all outgoing email from your site through Amazon Simple Email Services.
Install and configure the plugin appropriately.
WP SES configuration process
Upon activation, you’ll be prompted to configure it. Click the link to go to the plugin setting page.
– Input the ‘Sender‘ email address and the ‘Name‘.
– Set the return-path email that would handle replies and notifications.
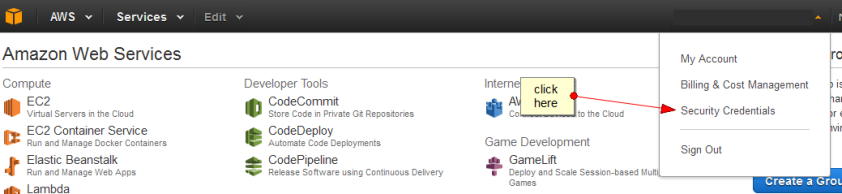
– Input your ‘Amazon Access Keys‘ into the appropriate fields. You can get this information on your AWS account dashboard under ‘Security Credentials‘.
– The next stage is to confirm the ownership of your email address. To do this, click on ‘Add this email‘, just below the confirmed senders table.
A verification link will be send to that email address. Click the link and the email address will be confirmed.
To be pretty sure your WordPress site is set to deliver messages via SES, you need to send a test mail.
WP SES provides this feature for newly confirmed email addresses.
Click on ‘Send Test Email‘ and check your inbox to see if you received it. If not, you might have to go over the steps again to check if you’ve omitted steps.
The next stage is to request for ‘Production Access‘ on Amazon SES. This should be done after you have received a test mail in your inbox.
How to request Amazon SES production access
It is important to request SES production access in order to move out from sandbox – the limitations set on your email sending capacity.
This provision according to Amazon Web Services, help protect you from fraud and abuse, and also help you establish your trustworthiness to ISPs and email recipients.
However, the following restrictions are in effect:
- You can only send mail to the Amazon SES mailbox simulator and to verified email addresses and domains.
- You can only send mail from verified email addresses and domains.
- You can send a maximum of 200 messages per 24-hour period.
- Amazon SES can accept a maximum of one message from your account per second.
I doubt you want to confine your mail delivery capacity to these limitations and stress.
Okay, to request production access, you’ll have to login to your AWS account.
Go to ‘Support‘ and click ‘Support Center‘.
Then click on ‘Create Case‘ on the dashboard.
Fill the form appropriately. See a sample on the screenshot below.
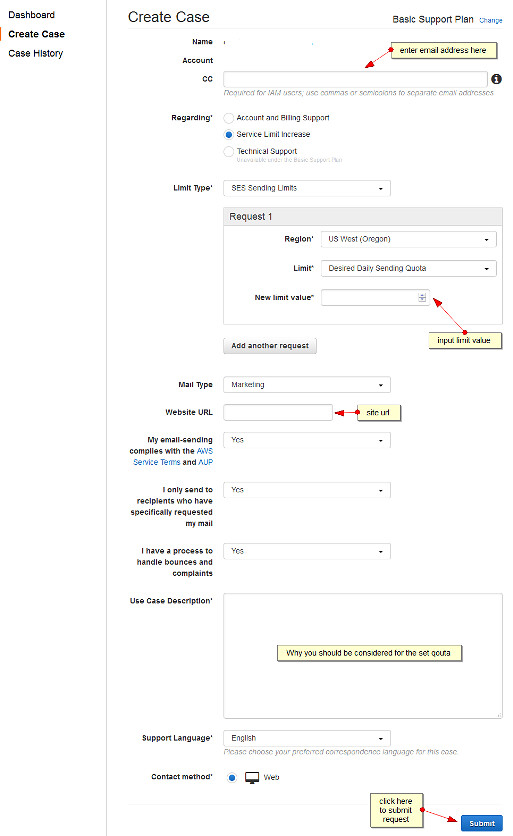 You also have to state genuine reason your account should be moved out of sandbox in the ‘Use case Description‘ field.
Below is a typical format we used:
As the creative developer and online marketing personnel at Frandimore web design agency, I help our client setup newsletter delivery process as part of our web design service package.
Being the founder, I intend to manage every credit purchase for email delivery in one place hence the need to setup Amazon SES.
Presently, we have twenty-five (25) clients we help manage newsletter delivery for, with an average weekly delivery of about 120,000 emails.
These newsletters are sent weekly while some are on monthly basis.
In view of this, I would beg for an upgrade of 10,000 email limit per day.
Working within this limit, we can still schedule multiple email delivery to suit the current demand of our clients and even take care of our in-house email needs. Thank you for the anticipated approval.
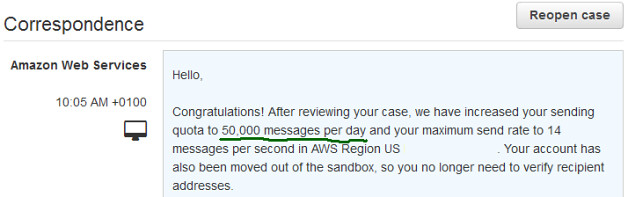
Response may take up to 24hrs or more. For us, we were surprised to be granted 50,000 emails per day sending quota. We have also been moved up significantly though steadily without prior request.
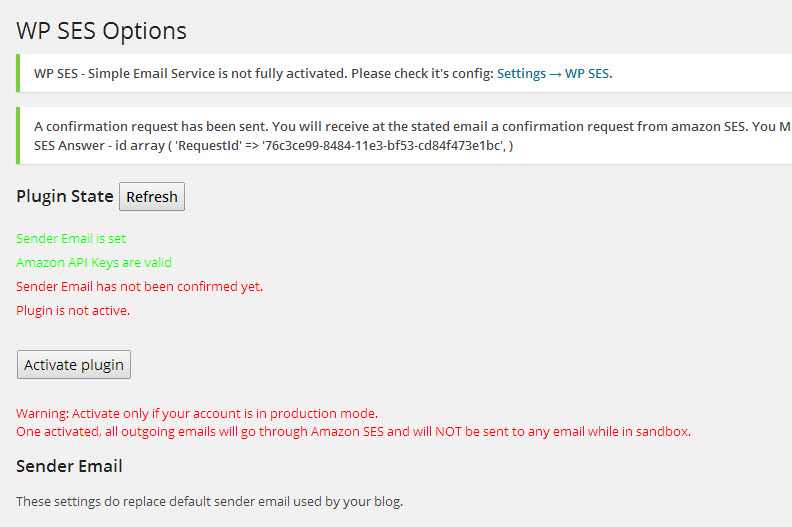
The coast is now clear for you to activate WP SES plugin on your WordPress admin dashboard once production access has been granted. Go ahead and do just that.
The plugin is so dynamically systemic that it let you know what stage you are on the steps of configuration.
Do not hesitate to test this newly configured plugin. Simply use any of your contact forms to send message.
Check if you got it and it delivered according to your pre-set settings.
Beyond transactional message delivery, Amazon SES can be your best Haven for bulk email campaign both for newsletter or marketing purposes.
How to set Amazon SES for newsletter or bulk mail delivery management
All you need to do in addition to the above processes is to install newsletter management software that allows third party SMTP.
From my experience and research, I discovered that MyMail plugin is still the best premium plugin for newsletter management if integrated with Amazon Simple Email Services.
MailPoet would have taken this position, but apart from the pricing regime that is base on yearly subscription, it is a little expensive and does not support third party email templates despite the fact that their email templates are not responsive.
MyMail plugin is cheaper (one-time payment of $40 with access to update for life), default email template is responsive and it works with other responsive email templates. (Note, mobile inclusion is currently the in-thing).
These among other features are the reasons we use MyMail even though we discovered it has a major drawback in that it doesn’t allow you to filter automatically recipients that clicked or opened your mail even though you can view them on the stats.
You have to do this manually on the stats page if you want to extract recipients that clicked or opened your message. MailPoet does this perfectly on their premium plan.
However, if you still want to use MyMail plugin to manage your newsletter, then follow the procedure below.
How to integrate Amazon SES on MyMail plugin
Install and activate the premium version of MyMail pluginaff on your WordPress site. Also install and activate Amazon SES for MyMail plugin.
Go to ‘Newsletter‘ on your WP dashboard and click on ‘Settings‘.
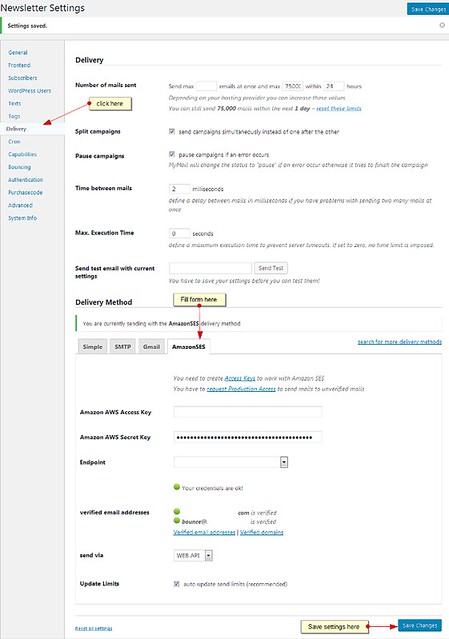
On the menu list, click ‘Delivery‘.
Scroll down to ‘Delivery Method‘ and click ‘AmazonSES‘.
Fill all the required fields appropriately. You’ll have to get the needed information on your AWS account.
Ensure you choose the correct ‘Endpoint‘ for your account (the region you requested production access).
It is also important to verify a dedicated email address to handle bounce emails. Don’t forget to configure this email under ‘Bouncing‘ on MyMail setting page.
Click ‘Save changes‘ and you are done.
Please, note that you have to also configure this plugin (MyMail) for effective newsletter management.
Now, you may have to delete WP SES plugin because MyMail has the capacity to redirect every outgoing mail through SES.
All you need to do is to go to ‘General‘ on the setting page. Scroll down to ‘System mails‘ and check ‘Use MyMail for all outgoing WordPress mails‘.
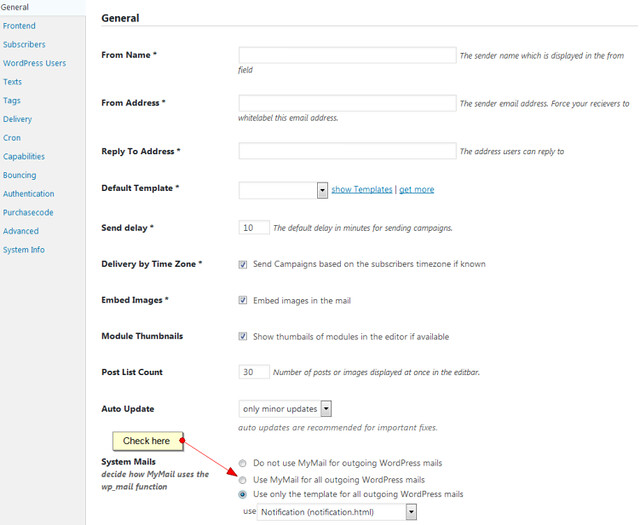
You also have the option to select the email template you want using the drop-down box just below it.
Now go ahead and compose a campaign and send a test mail.
Conclusion: There is no doubt about the fact that Amazon Simple Email Service is the cheapest and most effective email delivery management around.
The payment schedule is also very liberal, allowing payment delay or monthly payment just like Facebook advert payment system. You pay for what you use.
This is a great package for startups and infopreneurs on low budget wanting to use email marketing to reach both customer and targeted audience.
However, the setup on WordPress may look cumbersome, but the result you get at the end of the day worth all the trouble given the fact that it’s a onetime setup.
If you want to keep enjoying sending email through this medium, you have to ensure your recipient email addresses are genuine and not outdated.
Otherwise, if your spam-score rises beyond the set tolerance limit of 0.5% at any given time you send messages, your account may be put on probation and outright suspension if the issue persist.
With all these pros and cons, would you still prefer Amazon SES handles your email delivery on your WordPress powered website? Speak your mind in the comment box below. It’s all yours to spill!